How to use Viewmesh: Difference between revisions
Created page with ''''First''' you need some tools: (Required) Viewmesh is an application which is able to load and view PlaneShift models, including items and characters. To download it, refer to …' |
No edit summary |
||
| (2 intermediate revisions by the same user not shown) | |||
| Line 6: | Line 6: | ||
'''Second''' install and run viewmesh, on windows you launch it with viewmesh.bat. At the moment the application does not have any model, so you will not be able to load anything. Just verify you can move with the arrows keys and you see the 3d room. | '''Second''' install and run viewmesh, on windows you launch it with viewmesh.bat. At the moment the application does not have any model, so you will not be able to load anything. Just verify you can move with the arrows keys and you see the 3d room. | ||
'''Third''' get the sample stonebreaker model from [http://www.planeshift.it/download/prospects/viewmesh_stonebm.zip here]. Unzip it into the /data/models directory found in your viewmesh installation. If you want you can create another directory there like /data/models/stonebm or you can just unzip into the /data/models dir, as you prefer. If it's a model taken from planeshift, the model is not ready to go because it uses the planeshift paths, which you have to remove. Open stonebm.cal3d in a text editor, then do a find and replace, replace ALL occurrences of /planeshift/models/stonebm with nothing (so deleting all those). Then delete the line . Now the model is ready for viewmesh usage. | '''Third''' get the sample stonebreaker model from [http://www.planeshift.it/public/download/prospects/viewmesh_stonebm.zip here]. Unzip it into the /data/models directory found in your viewmesh installation. If you want you can create another directory there like /data/models/stonebm or you can just unzip into the /data/models dir, as you prefer. If it's a model taken from planeshift, the model is not ready to go because it uses the planeshift paths, which you have to remove. Open stonebm.cal3d in a text editor, then do a find and replace, replace ALL occurrences of /planeshift/models/stonebm with nothing (so deleting all those). Then delete the line . Now the model is ready for viewmesh usage. | ||
'''Forth''' load viewmesh and follow the steps below to view your model. | '''Forth''' load viewmesh and follow the steps below to view your model. | ||
| Line 12: | Line 12: | ||
Click on load. | Click on load. | ||
http://www.planeshift.it/download/prospects/viewmesh0000.jpg | http://www.planeshift.it/public/download/prospects/viewmesh0000.jpg | ||
| Line 18: | Line 18: | ||
http://www.planeshift.it/download/prospects/viewmesh0001.jpg | http://www.planeshift.it/public/download/prospects/viewmesh0001.jpg | ||
http://www.planeshift.it/download/prospects/viewmesh0002.jpg | http://www.planeshift.it/public/download/prospects/viewmesh0002.jpg | ||
Then select your model. If it's a character pick the .cal3d file. If it's an item, click the .spr file. In our example you will select the stonebm.cal3d file. Then you click on OK. | Then select your model. If it's a character pick the .cal3d file. If it's an item, click the .spr file. In our example you will select the stonebm.cal3d file. Then you click on OK. | ||
http://www.planeshift.it/download/prospects/viewmesh0003.jpg | http://www.planeshift.it/public/download/prospects/viewmesh0003.jpg | ||
You can move the view just by clicking on the 3d window and dragging your mouse. Try all 3 mouse buttons, they move the view in different directions. | You can move the view just by clicking on the 3d window and dragging your mouse. Try all 3 mouse buttons, they move the view in different directions. | ||
| Line 37: | Line 37: | ||
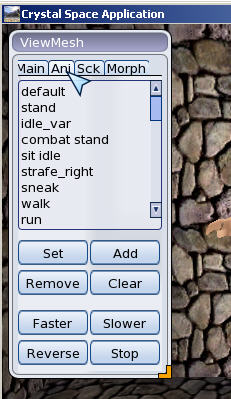
'''Fifth''' try to see how the model looks when animated. Click on the "Ani" tab | '''Fifth''' try to see how the model looks when animated. Click on the "Ani" tab | ||
http://www.planeshift.it/download/prospects/viewmesh0004.jpg | http://www.planeshift.it/public/download/prospects/viewmesh0004.jpg | ||
Then select "stand" from the list and click on "Set". You will see your char stand for a few seconds. | Then select "stand" from the list and click on "Set". You will see your char stand for a few seconds. | ||
| Line 43: | Line 43: | ||
'''Sixth''' Now let's familiarize with how textures are declared and loaded. From windows explorer (or Mac folders) open the folder data/models (or data/models/stonebm). | '''Sixth''' Now let's familiarize with how textures are declared and loaded. From windows explorer (or Mac folders) open the folder data/models (or data/models/stonebm). | ||
http://www.planeshift.it/download/prospects/viewmesh0005.jpg | http://www.planeshift.it/public/download/prospects/viewmesh0005.jpg | ||
| Line 70: | Line 70: | ||
The new texture should be placed in the same location of the cal3d file. | The new texture should be placed in the same location of the cal3d file. | ||
'''Seventh''' Now that you changed the texture, you can click on Reload to see the difference in the viewer. You can click on reload also if you just edited the image, to have a quick preview. | '''Seventh''' Now that you changed the texture, you can click on Reload to see the difference in the viewer. You can click on reload also if you just edited the image, to have a quick preview. | ||
http://www.planeshift.it/download/prospects/viewmesh0006.jpg | http://www.planeshift.it/public/download/prospects/viewmesh0006.jpg | ||
Latest revision as of 19:06, 21 September 2014
First you need some tools: (Required) Viewmesh is an application which is able to load and view PlaneShift models, including items and characters. To download it, refer to the main page in the Tools section.
(Optional) If you are using Photoshop to edit the files, it can be handy for you to get the DDS tools. DDS is a graphic file format used by videogames, which stores the image in a way to be easy for the videocard to load.
Second install and run viewmesh, on windows you launch it with viewmesh.bat. At the moment the application does not have any model, so you will not be able to load anything. Just verify you can move with the arrows keys and you see the 3d room.
Third get the sample stonebreaker model from here. Unzip it into the /data/models directory found in your viewmesh installation. If you want you can create another directory there like /data/models/stonebm or you can just unzip into the /data/models dir, as you prefer. If it's a model taken from planeshift, the model is not ready to go because it uses the planeshift paths, which you have to remove. Open stonebm.cal3d in a text editor, then do a find and replace, replace ALL occurrences of /planeshift/models/stonebm with nothing (so deleting all those). Then delete the line . Now the model is ready for viewmesh usage.
Forth load viewmesh and follow the steps below to view your model.
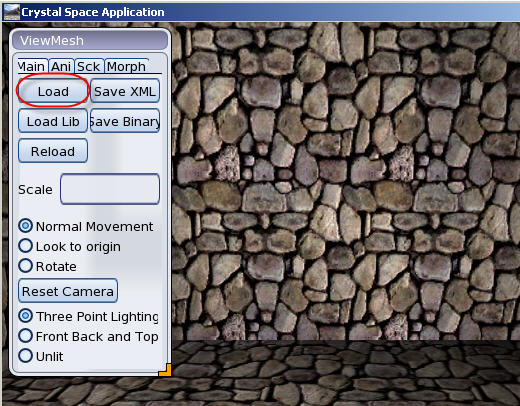
Click on load.
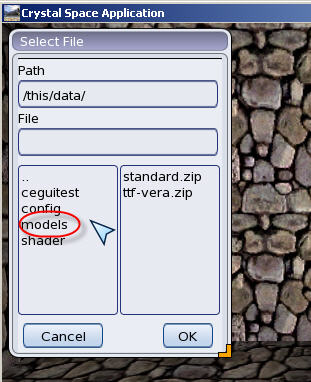
Then click on data and on models.

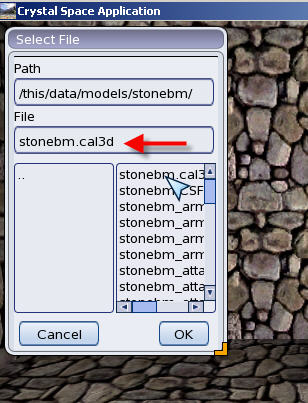
Then select your model. If it's a character pick the .cal3d file. If it's an item, click the .spr file. In our example you will select the stonebm.cal3d file. Then you click on OK.
You can move the view just by clicking on the 3d window and dragging your mouse. Try all 3 mouse buttons, they move the view in different directions.
You may want to use the arrows key for more precise movement, in this case be sure to select either: "Normal Movement", "Look to origin" or "Rotate". Those 3 settings affect how the arrow keys move the view.
If the model is too small or you just want to see some detail, you can increase the scale, example from 1.00 to 2.00.
If you want to change the lighting, just use the settings "Three point lighting", "Front, Back and Top" or "Unlit"
Fifth try to see how the model looks when animated. Click on the "Ani" tab
Then select "stand" from the list and click on "Set". You will see your char stand for a few seconds.
Sixth Now let's familiarize with how textures are declared and loaded. From windows explorer (or Mac folders) open the folder data/models (or data/models/stonebm).
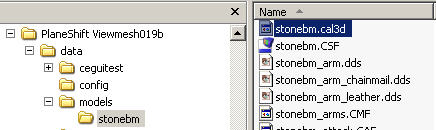
You will see there a number of files, including textures (all .dds files) and a .cal3d file called stonebm.cal3d. This file is the one which controls which textures are used for which body part. It also controls the body parts to load. Open the stonebm.cal3d file with a text editor.
Locate the section:
Locate the <textures> section:
 <textures>
       <texture name="stonebm_hair_text"><file>stonebm_hair.dds</file></texture>
       <texture name="stonebm_torso_texture"><file>stonebm_torso_plate.png</file></texture>
       <texture name="stonebm_head_texture"><file>stonebm_head.dds</file></texture>
       <texture name="stonebm_foot_texture"><file>stonebm_foot.dds</file></texture>
You can change the head texture for example to use another file:
<texture name="stonebm_head_texture"><file>stonebm_head2.png</file></texture>
In this case we use stonebm_head2.png instead of stonebm_head.dds
The new texture should be placed in the same location of the cal3d file.
The new texture should be placed in the same location of the cal3d file.
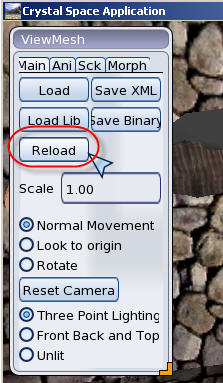
Seventh Now that you changed the texture, you can click on Reload to see the difference in the viewer. You can click on reload also if you just edited the image, to have a quick preview.